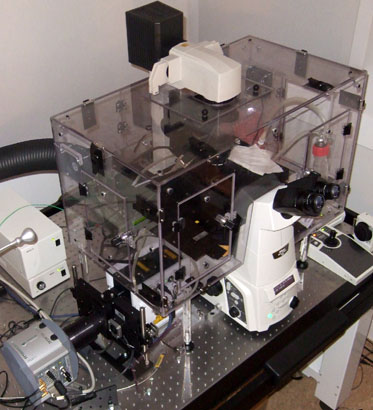
Location: No longer available (moved to CEDOC)
Manufacturer: Andor Technology
Model: Revolution XD
Year: 2009
SN: PU-0171


Andor Revolution Booking
Andor Revolution Usage Statistics
Andor Revolution FAQ  

===== System overview ===== The Andor Revolution //spinning disk confocal microscope// is a fast imaging system which provides a trade-off between confocality, resolution and speed. It is an inverted microscope ideal for live cell applications which require fast acquisition speeds rather than high resolution images. The scanning unit achieves confocality by directing light through a [[http://zeiss-campus.magnet.fsu.edu/tutorials/spinningdisk/yokogawa/yokogawatutorialfigure1.jpg|spinning disk with many small pinholes]]. Images are then acquired with a sensitive EMCCD which allows for very small exposure times but is limited in resolution to 512x512 pixels. The stage is motorized and furthermore equipped with a piezo for Z displacement so fast 4D imaging is possible in multiple stage positions. The system is also equipped with a large size incubator for temperature control and a small stage incubator for CO2 supply. A UV laser is attached to the back port of the microscope for spot laser ablation. With this system you can perform optical sectioning of fluorescent samples which are too thick for a widefield system such as the [[zeiss_axiovert_200m|Zeiss Axiovert 200M]]. Even though its resolution is not as high as a //point-scanning confocal system// such as the [[zeiss_lsm_510_meta|Zeiss LSM 510 META]] or [[zeiss_lsm_710|Zeiss LSM 710]], it is much faster than these two systems. If you need to use an upright microscope, check the [[zeiss_lsm_7_live|Zeiss LSM 5 Live]] fast confocal system instead. If your personal computer cannot handle all the data you collected, check out the [[big_guy|Big Guy]]. * **Microscope**: [[https://www.nikoninstruments.com/en_EU/Products/Inverted-Microscopes/Eclipse-Ti-E|Nikon Eclipse Ti-E]] * **Confocal scanner**: [[http://www.andor.com/microscopy_systems/peripherals/confocal_scanners/|Yokogawa CSU-x1]] * **Camera**: [[http://www.andor.com/scientific-cameras/ixon-emccd-camera-series/ixon-ultra-897|Andor iXon 897 EMCCD]] **Interactive Flash Tutorial**: [[http://zeiss-campus.magnet.fsu.edu/tutorials/spinningdisk/synchronization/index.html|Learn how to synchronize spinning disk rotation with camera exposure times]] ===== System components ===== ==== LASERs ==== ^ Laser Unit ^ Wavelength ^ Maximum Power ^ Current Status ^ | Diode CW 405 | 405 nm | 50 mW | ok | | OPSL CW 488 | 488 nm | 75 mW | ok | | DPSS 561 | 561 nm | 75 mW | ok | | DPSS 640 | 640 nm | 40 mW | ok | ==== Objectives ==== ^ Magnification ^ Model ^ Type ^ NA ^ WD (mm) ^ pixel size (μm) ^ 10 μm = ^ | 10x | [[http://objectives.nikoninstruments.com/compare.php?c[]=55|Plan Fluor PFS ]] | Dry | 0.30 | 16 | 1.43 | 7 pixels | | 20x | [[http://objectives.nikoninstruments.com/compare.php?c[]=48|Super Fluor PFS ]] | Dry | 0.75 | 1 | 0.71 | 14 pixels | | 40x | [[http://objectives.nikoninstruments.com/compare.php?c[]=62|Plan Fluor PFS ]] | Oil | 1.30 | 0.22 | 0.36 | 28 pixels | | 60x | [[http://objectives.nikoninstruments.com/compare.php?c[]=93|Plan Apo VC PFS ]] | Oil | 1.40 | 0.13 | 0.24 | 42 pixels | | 100x | [[http://objectives.nikoninstruments.com/compare.php?c[]=76|Plan Fluor PFS ]] | Oil | 1.30 | 0.20 | 0.14 | 70 pixels | ==== Emission Filtersets ==== ^ Setting ^ Transmission ^ | 0: QUAD | 420-460 + 511-531 + 590-624 + 678-722 nm | | 1: 685 | 665-705 nm | | 2: 605 | 579-631 nm | | 3: 525 | 500-550 nm | | 4: 447 | 417-477 nm | | 5: Block | No Transmission | | 6: BF | Empty - Full Transmission | | 7: analyzer | DIC Polarizer | | 8: 568LP | 581-1282 nm | | 9: 488LP | 500-1100 nm | ===== Microscope Turn On Procedure ===== * Turn on the main cabinet switch {{cabinet_switch.jpg?width=150|}} * Turn on the stage controller and transmitted light power (if needed) {{stage_transmitted.jpg?width=100|}} * Turn on the Yokogawa spinning disk scanner {{yokogawa.jpg?width=150|}} * Turn on the Nikon microscope (button on the right side, near the back) {{nikon_on.jpg?width=150|}} * Turn on the fluorescence lamp (if needed) {{fluorescence.jpg?width=100|}} * Turn on the computer * Wait 2 min to allow for system components detection * Start the iQ software * Place your sample on the stage/piezo holder * Turn the Prior piezo control on {{prior_piezo.jpg?width=150|}} ===== Microscope Turn Off Procedure ===== * Turn off the piezo control * Remove your sample from the stage/piezo holder * Exit the iQ software * Switch off the computer * Turn off all system components (no particular order) ---- [[resources|Back to the Equipment page]]